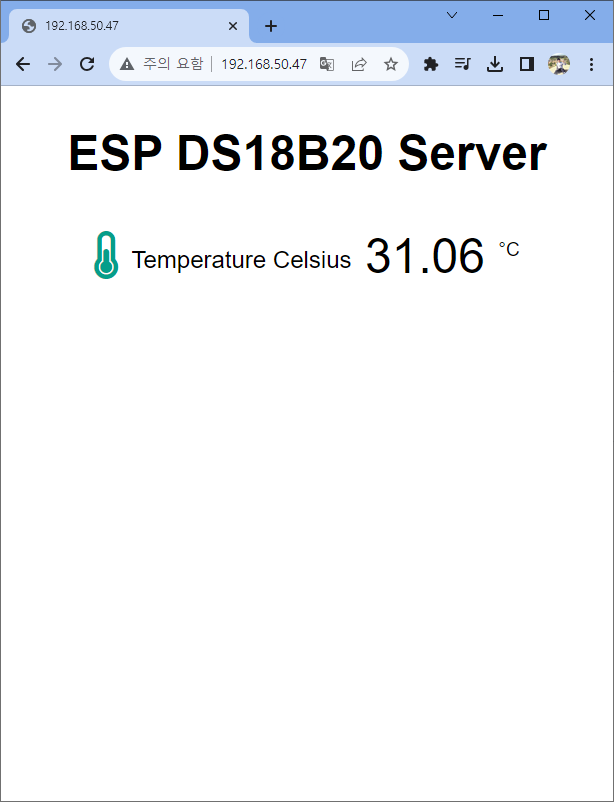
ESP32 와 ESP8266 에 DS18B20 온도 프로브를 이용해서 실시간으로 온도 값을 웹서버에 출력해보자.

결과를 미리보자면 위의 사진처럼 실시간 온도 값을 웹페이지를 통해서 확인할 수 있다.

회로는 위와같이 구성하면 되는데, 위 회로는 ESP8266 기준으로 되어있다.
ESP32 의 경우 자신이 사용하고 싶은 디지털 핀을 사용하면 되겠다.
#ifdef ESP32
#include <WiFi.h>
#include <ESPAsyncWebServer.h>
#else
#include <Arduino.h>
#include <ESP8266WiFi.h>
#include <Hash.h>
#include <ESPAsyncTCP.h>
#include <ESPAsyncWebServer.h>
#endif
#include <OneWire.h>
#include <DallasTemperature.h>
// Data wire is connected to GPIO 4
#define ONE_WIRE_BUS D4
// Setup a oneWire instance to communicate with any OneWire devices
OneWire oneWire(ONE_WIRE_BUS);
// Pass our oneWire reference to Dallas Temperature sensor
DallasTemperature sensors(&oneWire);
// Variables to store temperature values
String temperatureC = "";
// Timer variables
unsigned long lastTime = 0;
unsigned long timerDelay = 10000;
// Replace with your network credentials
const char* ssid = "WIFI 이름";
const char* password = "WIFI 비밀번호";
// Create AsyncWebServer object on port 80
AsyncWebServer server(80);
String readDSTemperatureC() {
// Call sensors.requestTemperatures() to issue a global temperature and Requests to all devices on the bus
sensors.requestTemperatures();
float tempC = sensors.getTempCByIndex(0);
if(tempC == -127.00) {
Serial.println("Failed to read from DS18B20 sensor");
return "--";
} else {
Serial.print("Temperature Celsius: ");
Serial.println(tempC);
}
return String(tempC);
}
const char index_html[] PROGMEM = R"rawliteral(
<!DOCTYPE HTML><html>
<head>
<meta name="viewport" content="width=device-width, initial-scale=1">
<link rel="stylesheet" href="https://use.fontawesome.com/releases/v5.7.2/css/all.css" integrity="sha384-fnmOCqbTlWIlj8LyTjo7mOUStjsKC4pOpQbqyi7RrhN7udi9RwhKkMHpvLbHG9Sr" crossorigin="anonymous">
<style>
html {
font-family: Arial;
display: inline-block;
margin: 0px auto;
text-align: center;
}
h2 { font-size: 3.0rem; }
p { font-size: 3.0rem; }
.units { font-size: 1.2rem; }
.ds-labels{
font-size: 1.5rem;
vertical-align:middle;
padding-bottom: 15px;
}
</style>
</head>
<body>
<h2>ESP DS18B20 Server</h2>
<p>
<i class="fas fa-thermometer-half" style="color:#059e8a;"></i>
<span class="ds-labels">Temperature Celsius</span>
<span id="temperaturec">%TEMPERATUREC%</span>
<sup class="units">°C</sup>
</p>
</body>
<script>
setInterval(function ( ) {
var xhttp = new XMLHttpRequest();
xhttp.onreadystatechange = function() {
if (this.readyState == 4 && this.status == 200) {
document.getElementById("temperaturec").innerHTML = this.responseText;
}
};
xhttp.open("GET", "/temperaturec", true);
xhttp.send();
}, 10000) ;
</script>
</html>)rawliteral";
// Replaces placeholder with DS18B20 values
String processor(const String& var){
//Serial.println(var);
if(var == "TEMPERATUREC"){
return temperatureC;
}
return String();
}
void setup(){
// Serial port for debugging purposes
Serial.begin(115200);
Serial.println();
// Start up the DS18B20 library
sensors.begin();
temperatureC = readDSTemperatureC();
// Connect to Wi-Fi
WiFi.begin(ssid, password);
Serial.println("Connecting to WiFi");
while (WiFi.status() != WL_CONNECTED) {
delay(500);
Serial.print(".");
}
Serial.println();
// Print ESP Local IP Address
Serial.println(WiFi.localIP());
// Route for root / web page
server.on("/", HTTP_GET, [](AsyncWebServerRequest *request){
request->send_P(200, "text/html", index_html, processor);
});
server.on("/temperaturec", HTTP_GET, [](AsyncWebServerRequest *request){
request->send_P(200, "text/plain", temperatureC.c_str());
});
// Start server
server.begin();
}
void loop(){
if ((millis() - lastTime) > timerDelay) {
temperatureC = readDSTemperatureC();
lastTime = millis();
}
}코드는 위의 코드를 업로드 해주면 된다.
라이브러리가 없다면 라이브러리를 설치해주어야 한다.
일단 DS18B20 센서를 ESP32 랑 ESP8266 에서 처음사용한다면
아래의 포스터를 확인해서 센서를 사용할 준비를 마치고 아래의 단계를 따라하면 된다.
https://diyver.tistory.com/212
아두이노 ESP8266 에서 DS18B20 방수 온도 센서 프로브 사용방법
ESP8266 에서 아두이노 IDE를 이용하여 DS18B20 방수형 온도 센서 프로브를 사용하는 방법을 알아보자. DS18B20 방수형 온도센서 방수형 온도센서 프로브 안에는 이런 센서가 들어가 있는데 센서 원형
diyver.tistory.com
실시간 온도를 출력하기 위해서는 Async 관련 라이브러리들이 있어야 한다.
아래 라이브러리 파일들을 다운받고
zip을 풀어주면 각각 ESPAsyncWebServer-master 폴더와 ESPAsyncTCP-master 폴더를 얻을 수 있는데,
두개 폴더 이름 뒤의 -master 를 지운 다음에 아두이노 라이브러리 폴더에 넣어주면 된다.
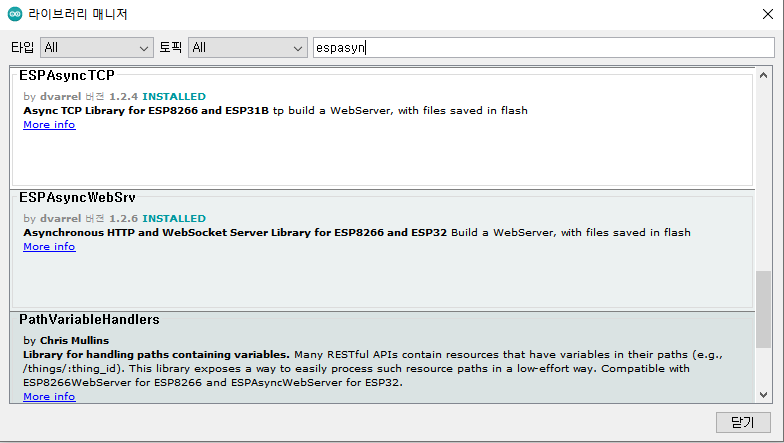
귀찮으면 아두이노 라이브러리 매니저에서 라이브러리를 설치해주면 되겠다.

espasyn 검색하고 스크롤 내리면
TCP 랑 WebSrv 두개 나오는데 두개 다 설치하면 된다.
라이브러리를 다 설치했으면,
코드를 업로드하고 웹페이지 열어서 실시간으로 온도값이 변하는 것을 확인하면 된다.
현재는 10초마다 온도값이 바뀔텐데, 코드에서 시간관련 코드들을 바꾸면 거의 즉시 출력하도록 바꿀 수 있다.
새로고침 없이 센서값을 계속 출력하는 방법으로
html 와 script 까지 이해를 해야 응용해서 사용할 수 있는 방법이다.
새로고침 없이 이렇게 출력을 할 수 있으면,
완성도가 매우 높아지므로, 코드를 뜯어보면서 해석하면 실력 향상에 큰 도움이 될 것으로 보인다.
'코딩 > 아두이노' 카테고리의 다른 글
| 아두이노 ESP8266 에서 DS18B20 방수 온도 센서 프로브 사용방법 (0) | 2023.08.13 |
|---|---|
| 아두이노 IDE에 ESP32 개발환경 세팅하기 (1) | 2022.09.07 |
| ESP32 wifi 접속을 스마트폰으로 설정하는 방법 wifi manager (1) | 2022.09.07 |
| ESP32 MySQL 데이터베이스에 데이터 등록 조회 하는 방법 (3) | 2022.09.07 |
| 아두이노 바코드 리더기로 바코드 찍는 방법 GM-65 (4) | 2022.09.07 |


댓글